

Hello everyone, today I'm gonna teach you how you can develop a image with rain effect, that is you can add rain in any image you want, it will be easy tutorial and will have realistic felling, using photo shop tools, this can be tried by any level of the user, that is if you are a newbie then it will be a learning experience as I'll be starting from the scratch. The final image will look as shown in the above image, and this tutorial will involve many techniques, so follow the steps carefully to get the desired result. Developing a embedded image, that is combination of many images can test your patience, usage of various kinds of filters and drawing skills, as well as your sensitivity with the mouse or mice usage. As I said, you will need lot of patience and concentration while developing the correct combination of colors and then adding shadow and glowing effects. Also, this tutorial will teach you the uses of many tools of photo shop which probably you might have not used it till now make you more familiar with photo shop. Also, this tutorial works fine with adobe photo shop CS4 and newer version which are released by adobe.
1) Open adobe photoshop and create a new document, which you can do it via file option in the menu bar or by pressing Ctrl+N simultaneously (you can skip this step, if would like to skip it). And then choose the size of the document you want to develop, I'm choosing 1024x1000, that is 1024 pixel width and 100 pixel as height, and resolution as 75 pixels/ inch though it can vary from computer to computer as resolution and the resolution of the image you want to develop is not same for everyone and I chose background as white with color mode as RGB (Red, green and blue) 8 bit with color mode as white.
2) Now open the image in adobe photo shop, in which you want to add rain effect by pressing Ctrl+O and then go to the directory in which the image is present and select it. I choose the below image for the demo,

3) Now, create a new layer by going to menu bar and then clicking on layer and then selecting new option from the drop down menu and then choose layer. And then change the blending mode of the new layer to screen. you can see the blending mode just above the place where you see the layers, also known as palette. We will develop the rain in this layer.
4) Now open the fill tool, you can do it by pressing Ctrl+F5 or by going to menu bar and then clicking on edit options and then selecting the fill option from the drop down menu. After you select the fill option a new window is popped out, change the use option to 50% grey (from drop down menu) and set opacity as 100% in blending options, and make sure the preserve transparency check box is not ticked/ checked, in the same window, and then press Ok.
5) Now we will start making the rain layer, for that go to menu ban and then click on filter and then choose noise, you see a side menu will be ejected, in that select the add noise option. Then you see a windows pops out, check/ tick the Monochromatic check box in the window and leave the default options as it is, though you can change them but it is not required as of now. You can try and play around with options (if you like to do it).
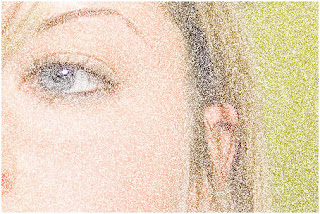
6) Now from menu bar click on image options and then choose the adjustments option from the drop down menu and then select the Auto Levels (you can do it directly by pressing Ctlr+Shift+L simultaneously) and then you can see the changes in the image, it would look like as shown in the below image,
7) Now again go to filter option in the menu bar and then select blur option, and in that select the motion blur from the menu which pops out. After you select motion blur a window pops out and there you can adjust the angle and distance, I choose them to be -80 degree and 210 pixels respectively, but you can alter the values accordingly, depending up on the angle at which you want the rain to fall look like and the distance will tell the length in the setting.
8) Now you could see that there are some slight variations but we would like to make rain more intense for that, go to image in menu bar and then choose adjustments from the drop down menu and then click on levels (also you can do it directly by pressing Ctrl+L, shortcut). A new window pops out, in that drag the pointers towards the center or according to your taste and requirement, you can see the intensity changes. MAke sure that the channel is selected as RGB, in the same window. Play around with the slider till you are satisfied with the density and then follow the next step.
9) Now if you are adding this rain effect on a high resolution image then it might look that rain is sharp and very thin, but in general rain is not thin and sharper instead it is a bit broad and rough when you look at it, so we are going to modify the effect accordingly in this step, to make the image look more realistic.
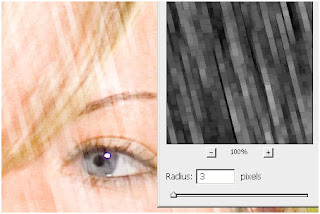
Go to menu bar and click on filter option and then from the drop down menu select the other and then choose maximum, and then you see a window pops out. Adjust the radius according to your requirement and taste and the amount of thickness you want for the rain. As a demo I made the radius more thick and you can see how the image looks after this step, as shown in the below image,
This step is optional, and if you think the developed rain effect before this step is adequate then you can skip this step.
10) Now as you can see that image is looking like a discrete pixels we will blur the effect a bit so that the effect looks more natural. For that go to menu bar and then choose filter option and then choose blur from the drop down menu and then select Gaussian Blur from the side menu. A window pops out, adjust the radius accordingly and you can see the preview simultaneously, stop adjusting when you feel the radius is perfect for your image.
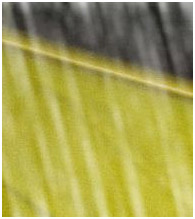
11) Now, you could see some glowness in the image (as shown in the bellow image), but in general rain drops doesn't glow, so will remove this glow in this step and then rain would look more realistic. For implementing this step press Ctrl+T (or go to menu bar and then choose edit option and then select the transform option from the drop down menu) and then select scale, then drag the corners of the box outwards till you see the glow effect is nullified or the rain looks natural, and it would require a bit of patience.
12) Now you are almost done ! But if you want you can reduce the opacity from the palette options of the current layer (though it is optional) and then you would see the final image, as shown in the starting of the post.
Also, you can add more Text, like developed by shek (or your name) at the bottom of the image so that nobody can use your developed image without your permission or text as 'a rainy day' or something like that, which is optional and very easy to embed with the tutorial specified in this post. In this tutorial you learned about many techniques which involve careful approach, use of filters and blur options extensively. And make sure that the image looks in synchronous mode and for that you should have lot of patience, then only you could become a professional.
This concludes the short and not to boring tutorial on developing a pre developed or photographed image into a rainy image and how to make it look more realistic and look like a image developed by professional. And now you can use the developed image as your desktop image or to showcase your talent to your friend and teach them, we should believe in spreading the knowledge.
Hope you didn’t got bored while reading the tutorial and implementing simultaneous in adobe photo shop on your Personal computer or laptop. To get the expected results just play around with the tools and colors which fits your requirement correctly and by doing that you will learn more about photo shop software, brushes used in various images and tools, color combination to use for better look of the image and at last you have fun and satisfaction that you developed something really wonderful using photo shop, and can go forward in your designing career using your creativity.
And at last, Have fun!! /bye
No comments:
Post a Comment